

How it works
The auth frame should only be launched after the check frame returnsconnectionRequired. The customer’s email address and optionally phone number (passed when you create a session) is how MoonPay identifies the user and where the one-time passcode is delivered:
- If MoonPay has a phone number on file for that user, the customer can choose to receive the code via SMS instead. If not, email is the only option.
- The customer does not need to be a returning MoonPay user. If no MoonPay account exists for the email yet, one is created during the OTP step. You can then drive any required onboarding or verification through other frames or directly via the API with the returned access token.
Handling email mismatches
Make sure the email you pass when creating the session matches the customer’s MoonPay account. If you send the wrong email — for example, a fresh address for a customer who already has an account under a different email — the auth flow will provision a brand-new account against the address you provided. The customer can later reverify with the correct email, but the duplicate account will be flagged. If a duplicate is detected, the customer will later be asked to resolve it through a challenge flow during verification. Use the full connect frame instead when you want MoonPay to orchestrate onboarding (KYC, address, document collection) inside the same flow.URL
Requirements
Key exchange
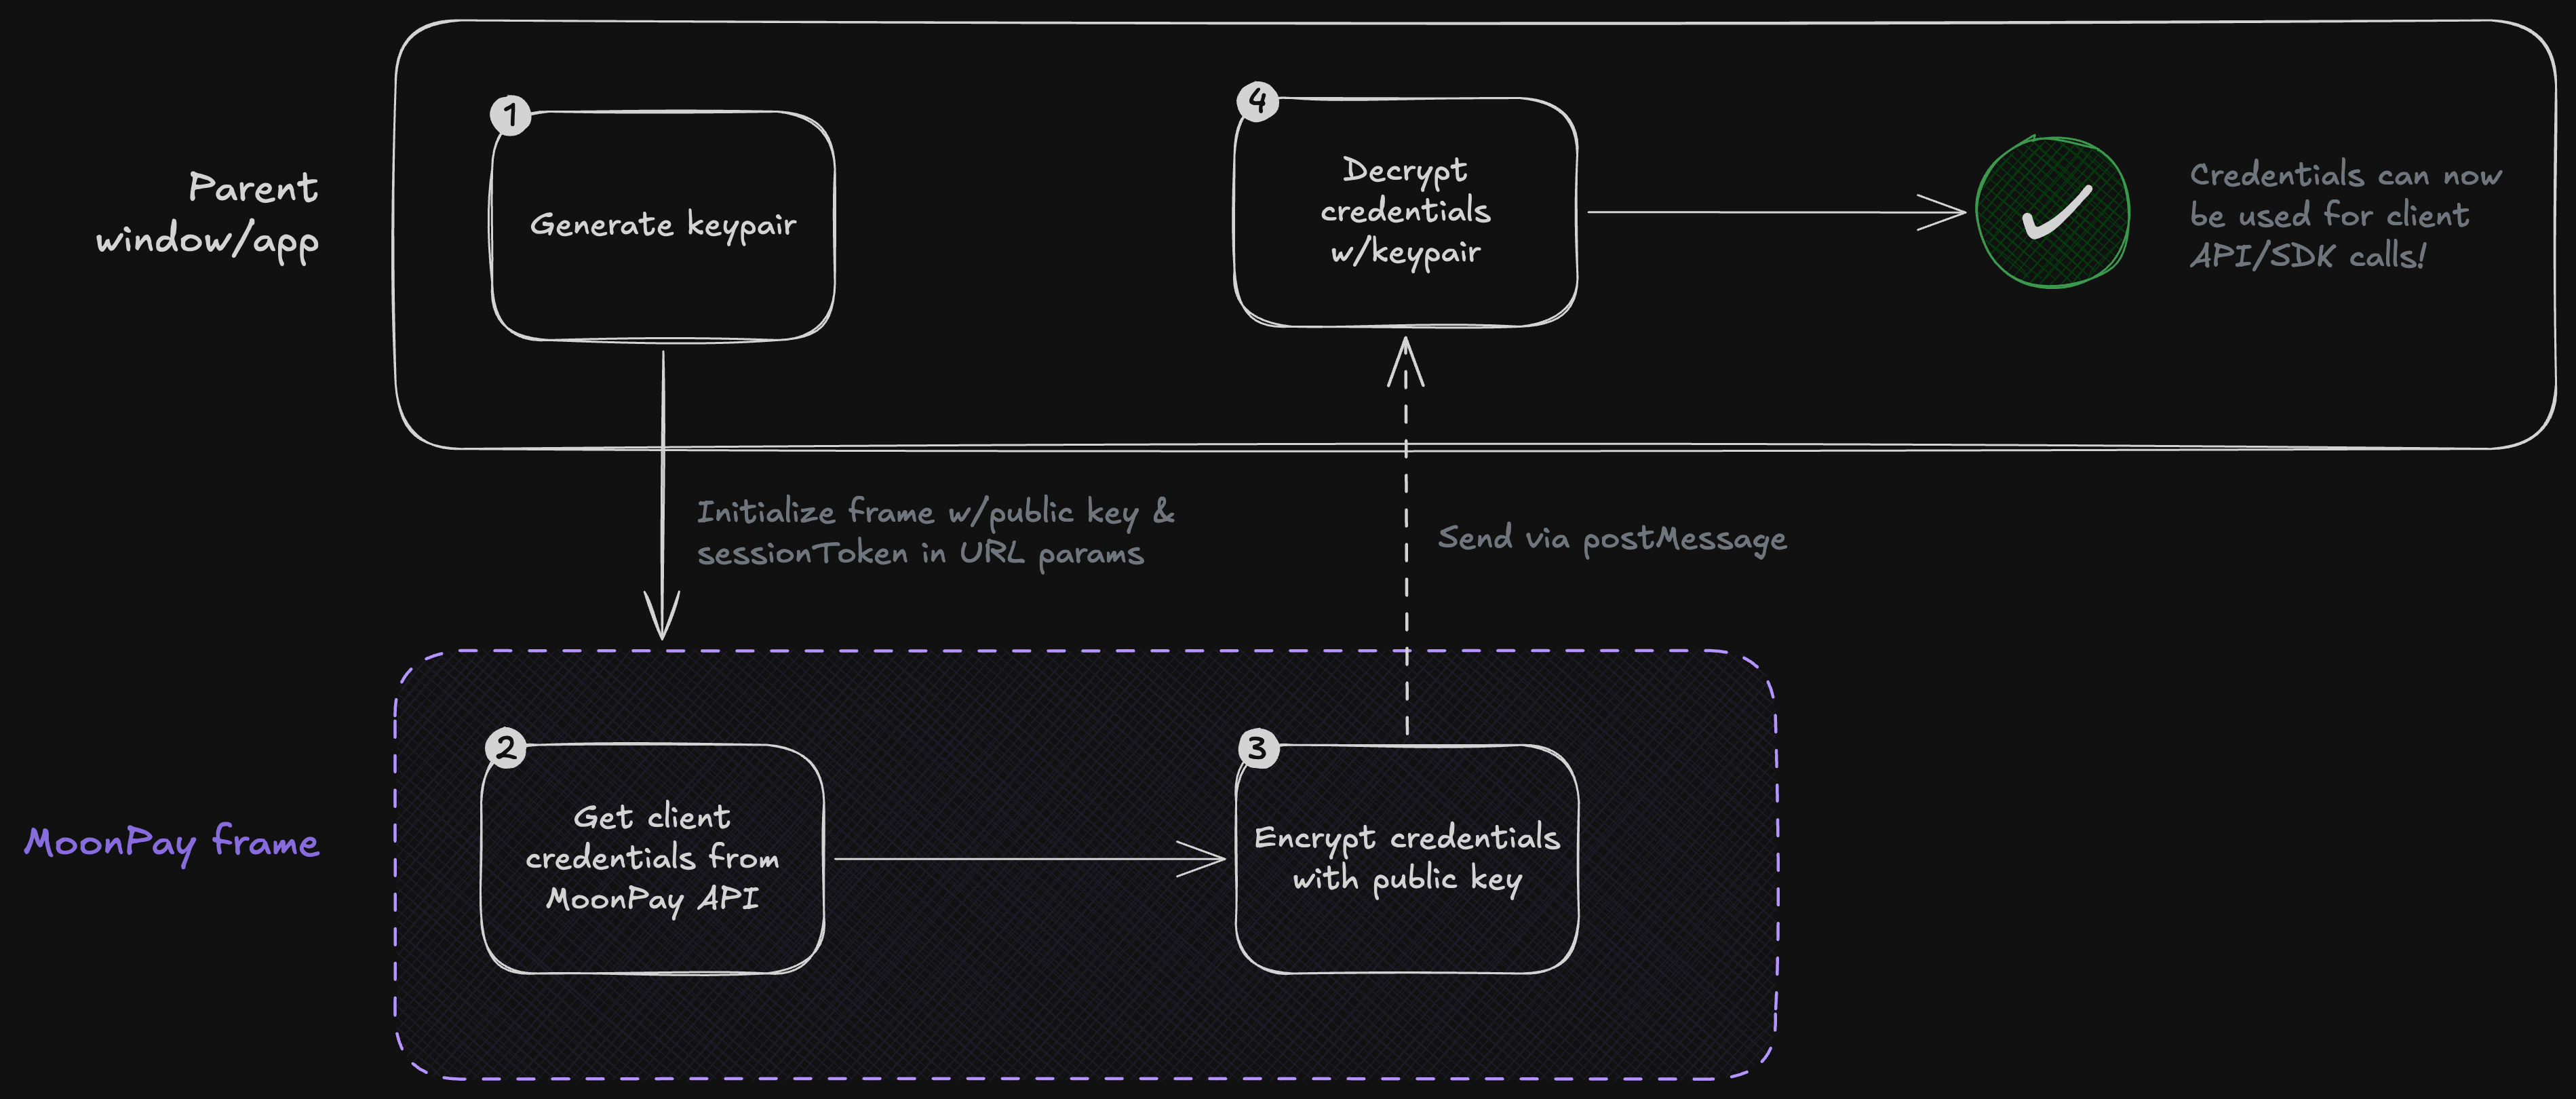
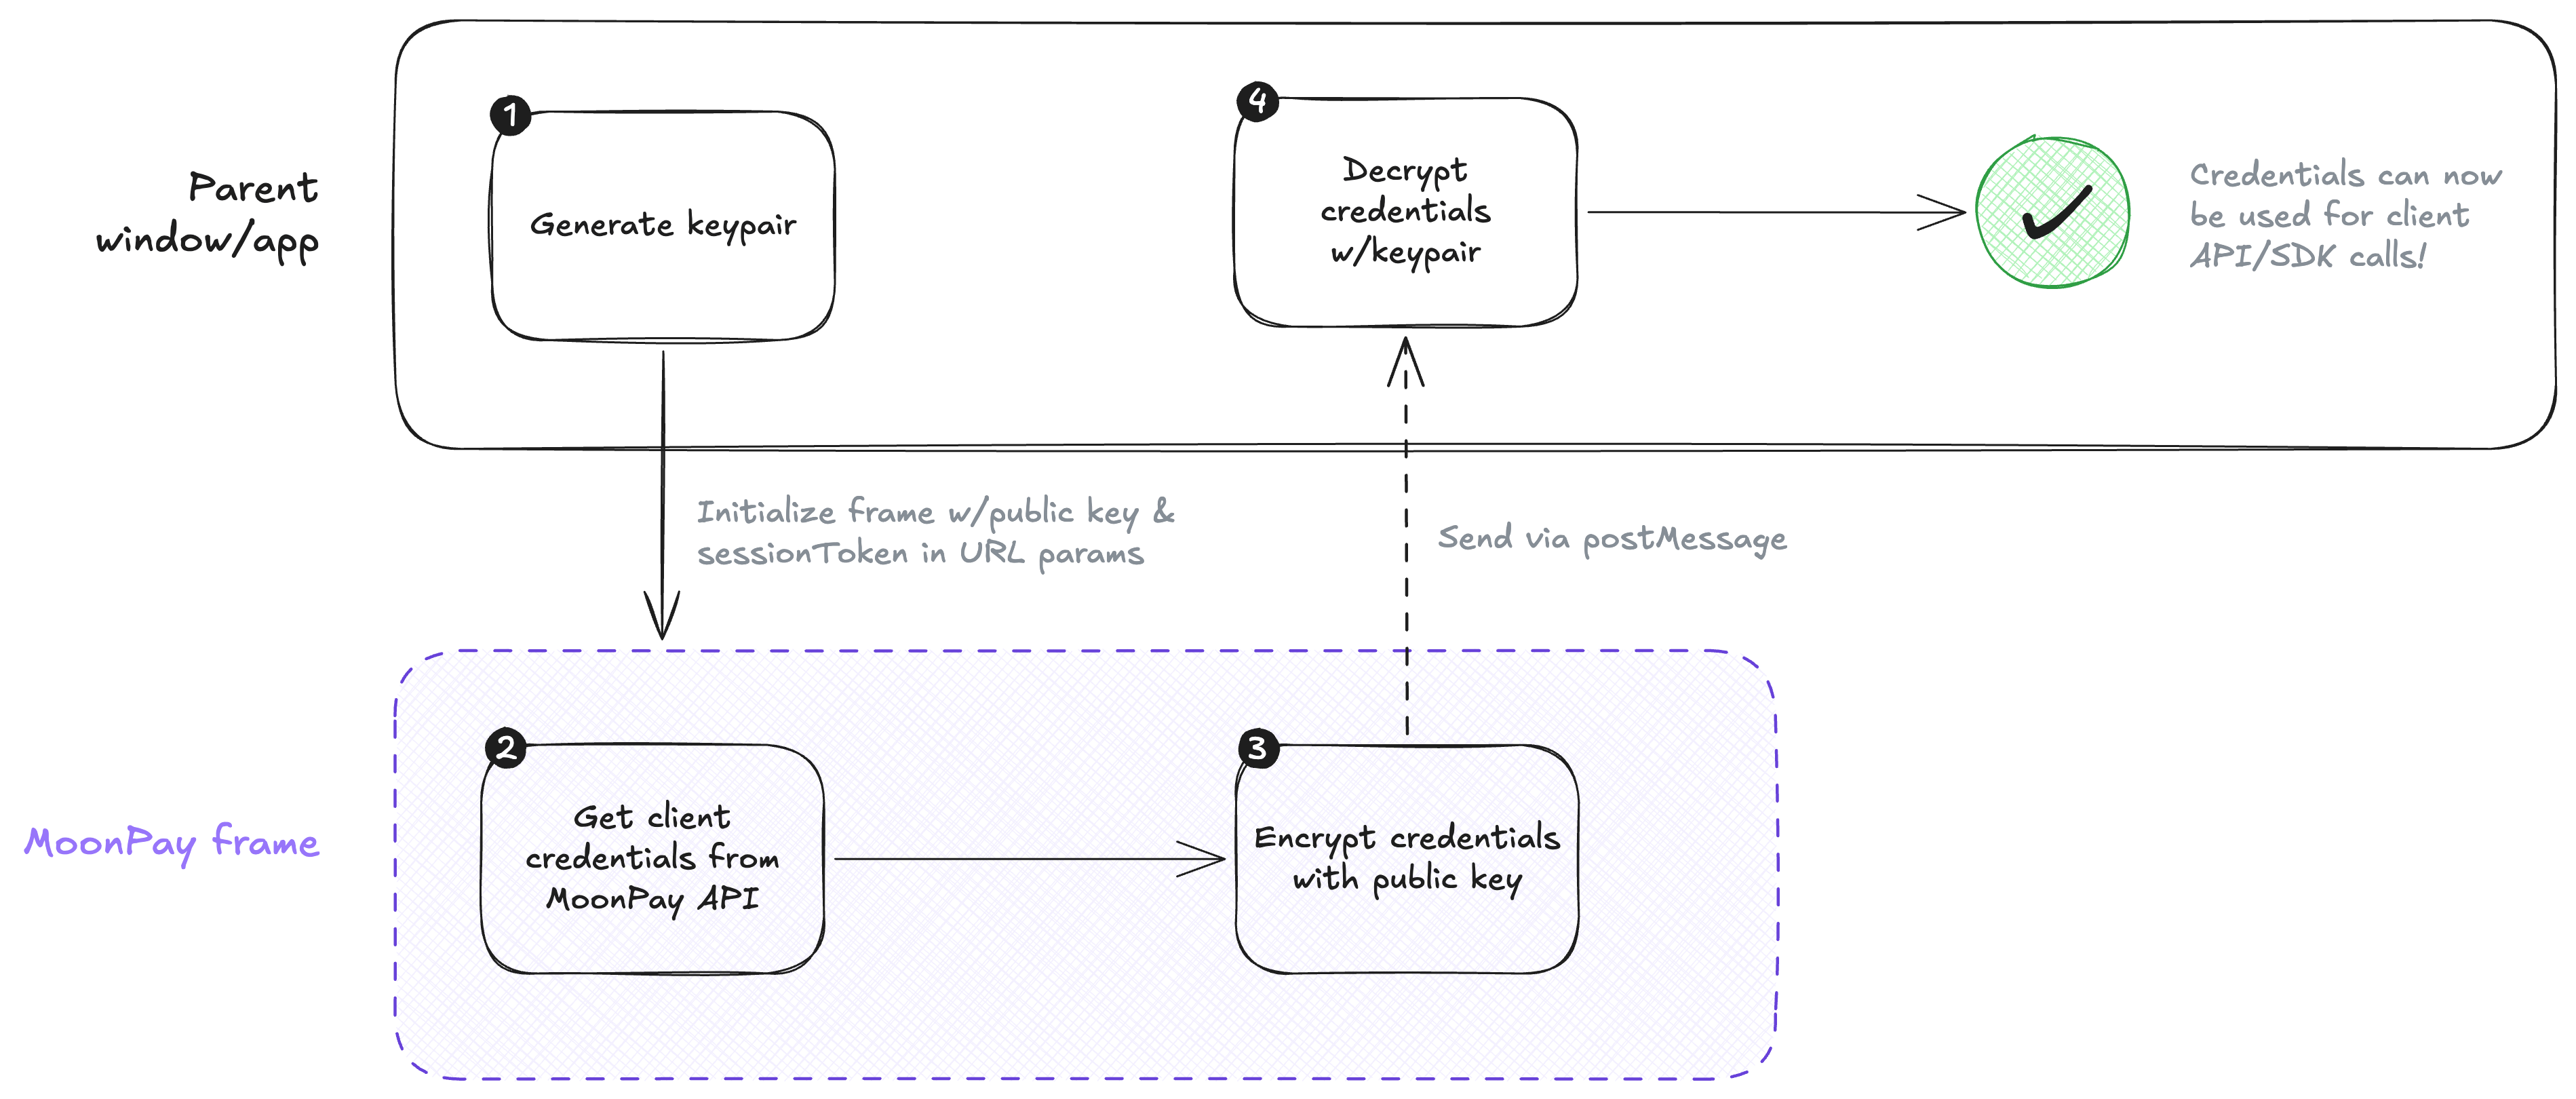
Credentials returned from the frame are encrypted to protect their content since they are sent overpostMessage. You need to generate an X25519 keypair and pass the public key into the frame. The frame uses your public key to encrypt the payload, ensuring only you can read it with your private key.
Example crypto module for web
Example crypto module for web
The following example shows how to generate a keypair and decrypt credentials using
@noble/curves. You’ll want to add your own error handling and input validation for production use.crypto.ts
Example crypto module for React Native
Example crypto module for React Native
The following example shows how to generate a keypair and decrypt credentials using
@noble/curves. You’ll want to add your own error handling and input validation for production use.In React Native, yuo will need a polyfill for getRandomValues (MDN) which is only available in browsers.crypto.ts
Co-branding
The frame is co-branded: it renders your account’s name and logo alongside MoonPay’s branding. Configure your name and logo in your MoonPay dashboard. You can’t override them with URL parameters.Initialization parameters
Events
All events are dispatched using the message pattern described in the frames protocol. Below are the event payloads specific to the auth frame.Outbound events
frame->parent These events are sent from this frame to the parent window.handshake
The frame requests that you open a message channel.
ready
The frame has loaded and dispatched the customer’s first one-time passcode. Use this to reveal the frame and drop any loading state you were showing in its place.
complete
The auth flow finished. The payload is a Connection object whose status field tells you the outcome:
active— the customer is authenticated. The payload includes the customer’s id and encrypted authenticated client credentials. Any outstanding KYC or onboarding requirement is surfaced throughcapabilities, not a separate status — use the returned access token to drive it.termsAcceptanceRequired— the customer must accept updated Terms of Use before the connection can be used. No credentials are attached: display the Terms of Use in your own UI, capture the acceptance timestamp, pass it astermsAcceptedAtwhen you create a new session (POST /platform/v1/sessions), then relaunch the flow. PassingtermsAcceptedAtrequires the Identity or Guest Checkout account capability.pending/unavailable— status-only completions with no credentials: the connection exists but isn’t currently usable (a KYC decision is still pending, or the customer is in a restricted location).
error
This event dispatches errors that occur in the flow. The error message is developer-facing and not intended to be rendered in UI.
The frame emits this event for every terminal error so the parent always knows when the flow has failed and can tear down the iframe or surface a fallback in your app. Recoverable mistakes the customer can retry inside the frame (such as an invalid or expired code) are not reported through this event — see Error handling for the full breakdown.
Terminal errors that occur during the flow carry code: "generic". Invalid initialization parameters — a missing or malformed clientToken, publicKey, or channelId — are instead reported with code: "validationError" and a list of the offending fields, before the OTP flow starts.
close
The customer dismissed the frame. The parent should tear down the iframe or WebView in response.
Inbound events
parent->frame These events are sent from the parent window to this frame.ack
Acknowledge the handshake.
Error handling
The auth frame splits failures into two categories. Inline errors are handled silently inside the frame so the customer can retry without the parent doing anything. Terminal errors end the flow — the frame shows a full-screen error state to the customer and sends anerror post-message to the parent at the same time, so your app can react (for example, by tearing down the iframe or surfacing a fallback).
Inline errors
These are recoverable mistakes the customer can fix without leaving the OTP screen. The frame shows an inline message under the code input and stays open so the customer can retry. The parent does not receive anerror event for these.
Terminal errors
These end the flow. The frame replaces its content with a full-screen error state — depending on the cause, the customer is offered a Retry button, a Close button, or both. The parent always receives anerror event with code: "generic" for every terminal error, so it can dismiss the iframe or surface a fallback in your app.